
Learn
Y-Balance Test | Postural Control | Return to Play (RTP) Testing
The Y-Balance Test is a shortened version of the star excursion balance test. It is reduced to test the anterior, posteromedial, and posterolateral reach.
According to a study by Plisky et al. (2006), the Y-balance test has excellent inter-rater reliability between 0.48 – 0.78.
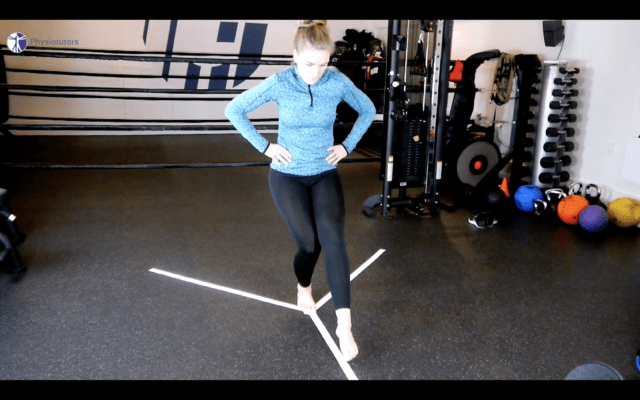
To conduct the test place three strips of tape on the ground in a Y shape. The angles between the anterior stripe and both posterior stripes are 135° with 45° between the two posterior stripes. Before the actual test is started, the patient is allowed to make 4-6 practice trials in each direction. For the actual test, the patient has 3 official test moments after which your patient can rest for 5 minutes.
For the anterior reach, the stance foot is placed with the toes at the zero mark position of the anterior-reach direction line. For the posteromedial and posterolateral reaches, the heel is placed at the zero mark position of the anterior-reach direction line.
To start, have your patient stand barefoot on one limb with his hands on the hips and ask him to try to reach as far as possible along the tape stripe. He or she needs to perform three trials standing on the right foot reaching in the anterior direction followed by three trials standing on the left foot reaching in the anterior direction. This procedure was repeated for the posteromedial and the posterolateral reach directions. The tape should be only touched lightly with the toes and the examiner marks the most distal point of contact on the tape. A trial is not considered complete if the participant touches the tape heavily, comes to rest at the midpoint, has to make contact with the ground to maintain balance, or shifts the foot of the stance limb.
To score the Y-Balance test, first calculate the average reach distance in each direction in centimeters, by taking the average of the three trials for each direction. So you should have 6 values; 3 for the left leg, and 3 for the right leg.
Then, calculate the distance in each direction as a percentage by taking the average distance in each direction, divided by the patient’s leg length, multiplied by 100.
This test can be useful and helpful for clinicians to determine deficits and asymmetries in individuals, as well as assist in the return-to-play decision-making process. For example, a study by Butler et al. (2013) concluded that college football players who had a composite score below 98.6% were 3.5 times more likely to get injured. Plisky et al. (2006) found that an anterior reach asymmetry of greater than 4cm predicted individuals at higher risk for lower limb injuries in basketball players.
Be aware however that there is a huge variance in performance and injury risk between sports and sexes, which is why no clear cut-off values for asymmetry are described.
Other useful performance tests that you might want to check out:
References
Get the 21 most useful orthopedic tests
Download our free e-book with the 21 most useful orthopedic tests per body region, to help you reach the right diagnosis.
Like what you’re learning?
Get the full Physiotutors Assessment Book
- 600+ pages on orthopedic assessment
- Video demonstrations and direct links to the PubMed studies
- Statistical values for every special test, from the latest research
- Free lifetime updates
- Available in English, German, French, Spanish, Italian, Portuguese and Turkish